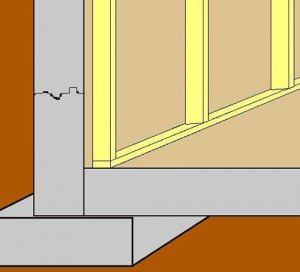
Once the SANI-TRED® basement waterproofing application has been completed; the best way of finishing basement walls would be by building from the floor to the ceiling rather than fastening the studs to the walls. By doing this you will have far fewer punctures to be concerned with and you do not have to rely on the foundation wall to be perfectly plumb.
For detailed instructions on our DIY basement finishing systems or on how to do-it-yourself finish basement walls by installing SANI-TRED®, click here.
Building Up Against the Wall
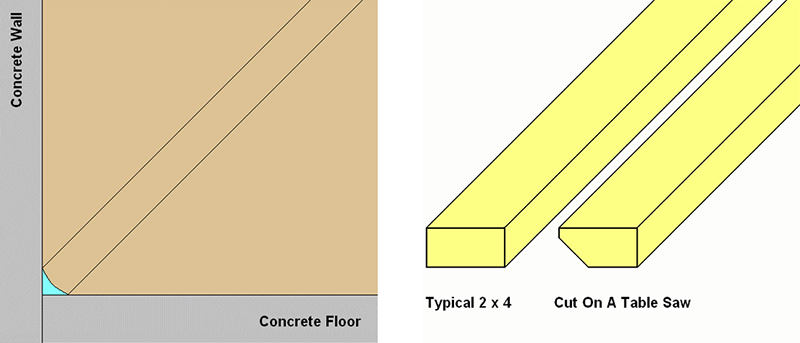
Cut Sole Plate
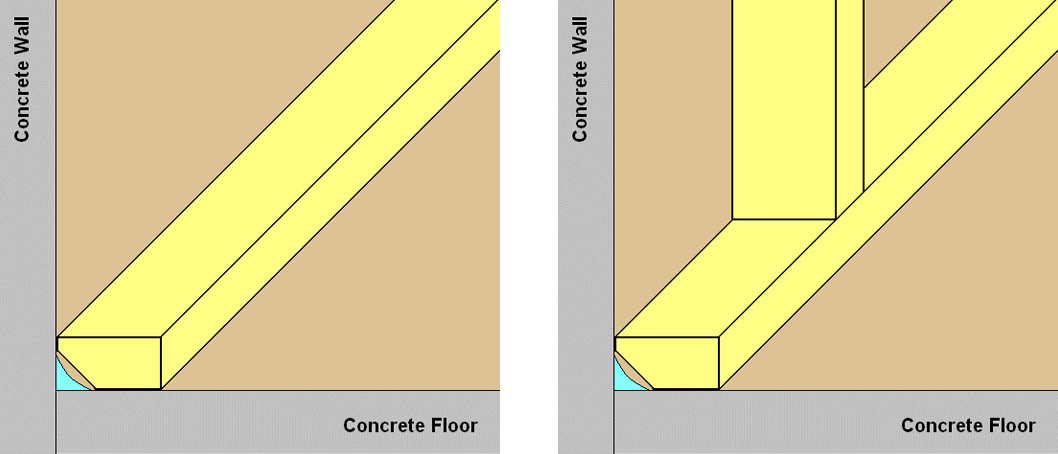
Constructing Stud Walls
Building Away from the Wall
Once the basement has been waterproofed you will have LRB/TAV™ applied where the wall meets the floor which will typically not allow a 2×4 (sole plate) to be placed up against the wall/floor junction. Below are diagrams showing a typical SANI-TRED® basement and the stud wall spaced away from the wall/floor junction.
- Apply a heavy coat of PermaFlex™ either on the underside of the lumber you wish to fasten to the floor or in the location on the floor that the lumber will be fastened.NOTE: Space the sole plate away from the wall as shown in the diagram below. The PermaFlex™ will permanently adhere the sole plate to the sealed floor. PermaFlex is not just a life-time waterproof coating, it is also a life-time adhesive coating; therefore fewer fasteners or NO fasteners are necessary. If physical fasteners are used the wet PermaFlex™ will seal the punctures.


- If the wall will be pre-built; just make sure the wall has built “slightly” short. Apply some PermaFlex™ below where the wall will be hung. Hang the wall from the ceiling joists and then just knock the sole plate down onto the wet PermaFlex™. Make sure the wall is now perfectly plumb. The PermaFlex™ will permanently adhere the sole plate to the sealed floor. PermaFlex™ is not just a life-time waterproof coating, it is also a life-time adhesive coating; therefore fewer fasteners or NO fasteners are necessary. If physical fasteners are used the wet PermaFlex™ will seal the punctures.
Setting Tile
SANI-TRED® products are used to permanently set tile, which makes do-it-yourself basement finishing much easier. Since SANI-TRED® products molecularly weld old-to-new and will permanently adhere to tile, SANI-TRED® is the very best adhesive to adhere tile to a previous Sani-Tred application. You would want to make sure that the back of your tiles do not have a shiny, glossy glaze on them. If they do, you would need to use our “Tile Etch” on the back of the tile:
- Apply 1 coat of PermaFlex™ (approx 240 sq ft per gal) to prime the backs of your tiles. Allow to cure tack free or at least until it has become quite tacky.
- Mix up a small batch of LRB/TAV™ mixture (Liquid Rubber Base, Thickening Activator) as your ‘thin set’. Many would use a 1/4” Notched Trowel or a 1/4” notched tool to evenly distribute the LRB/TAV™ mixture (approx 40 sq ft gal). Set your primed tiles in the LRB/TAV™ mixture. You can butt your tiles “side to side” or space them to accept standard grout. Grout may be used as soon as 3-4 hrs after setting the tiles.
Furring Strips
SANI-TRED® products are not just a permanent waterproof coating; they are also a permanent adhesive. Since SANI-TRED® products molecularly weld old-to-new, will permanently adhere to wood and most common building materials; SANI-TRED® is the very best adhesive to use for bonding to a previous SANI-TRED®application:
- Apply a heavy coat of PermaFlex™ either on the underside of the furring strip you wish to fasten to the floor or in the location on the floor that the furring strip will be fastened.
- Once the furring strip is in place, one only needs a few physical fasteners to hold the furring strip flat and the PermaFlex™ will seal any punctures made by the physical fasteners.
OPTIONAL: The furring strips can be simply weighted down so they are held flat until the PermaFlex™ is cured using NO physical fasteners. NO physical fasteners mean NO punctures to be concerned with.


