Comprehensive Guide to Concrete Step Repair with SANI-TRED®
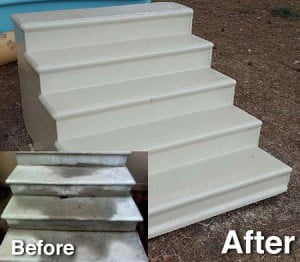
Deteriorating concrete steps can pose serious problems. Not only do they look unattractive, but they can also be unsafe and expensive to replace. Fortunately, with SANI-TRED® products, you can permanently repair and resurface all kinds of cracked and deteriorating concrete. SANI-TRED® permanently bonds with concrete at a molecular level, providing 590% elongation, ensuring a durable and flexible repair. Our heavy-duty concrete step refinishing options also add durability and traction, making your steps safe and long-lasting.
Why Choose SANI-TRED® for Concrete Step Repair?
SANI-TRED® products are known for their superior performance and durability. The unique formulation allows the product to penetrate deeply into the concrete, creating a strong bond that ensures long-lasting repairs. ADD NEW SENTENCES: Whether you're repairing concrete steps DIY-style for the first time or you're a seasoned contractor, SANI-TRED® delivers professional results without the professional price tag. Regardless of whether your project involves knowing how to resurface concrete steps from edge to edge or patching isolated damage, this system handles it all. Here are some key benefits of using SANI-TRED® for your concrete step repairs:
- Permanent Bonding: SANI-TRED® bonds with concrete at a molecular level, ensuring that the repair is permanent and durable.
- Flexibility: With 590% elongation, SANI-TRED® can expand and contract with the concrete, preventing future cracks.
- Durability: The heavy-duty nature of the product provides additional strength and traction to the repaired surface.
- Ease of Use: SANI-TRED® products are easy to apply, making them ideal for both DIY enthusiasts and professionals exploring how to reface concrete steps without the cost of full replacement.
Step-by-Step Guide to Repairing Concrete Steps with SANI-TRED®
This guide on how to repair concrete steps using SANI-TRED® covers several crucial steps to ensure a durable and professional finish. Whether your goal is full resurfacing concrete stairs or targeted crack repair, the following process applies to all levels of damage.
How To Repair Concrete Steps With Sani-Tred Step by Step
Step 1: Preparing the Substrate
Preparation is the first and most critical step when repairing concrete steps DIY. Ensuring the substrate is clean, dry, and free of any previously applied products and foreign matter is essential for achieving a strong bond. Follow these steps for proper preparation:
- Clean the Surface: Remove any dirt, debris, mold, or mildew from the concrete surface. Use a stiff brush or pressure washer to ensure the surface is thoroughly clean.
- Dry the Surface: Allow the concrete to dry completely before proceeding. Moisture can interfere with the adhesion of the SANI-TRED® products.
- Acid Etching: For poured concrete, acid etching is recommended. Mix Muriatic Acid with water (typically 1 part acid to 10 parts water) and apply it to the concrete. Scrub with a stiff-bristled brush and rinse thoroughly with water. Neutralize the acid according to product instructions.

Step 2: Applying the Primer Coat
Once the substrate is prepared, apply a primer coat of SANI-TRED® PermaFlex. This step ensures that the repair material bonds effectively with the concrete:
- Application: Apply one coat of PermaFlex at a rate of 240 square feet per gallon. Use a roller or brush to ensure even coverage.
- Drying Time: Allow the PermaFlex primer to dry completely. This usually takes a few hours, depending on the ambient temperature and humidity.
Step 3: Setting Up the Form
Creating a form is essential for shaping and containing the repair material. Here’s how to set up your form:
- Choose Materials: You can use plywood covered with sheet plastic (visqueen) to create the form. SANI-TRED® products will not adhere to visqueen, making it an ideal material for this purpose.
- Secure the Form: Position the form around the area to be repaired, ensuring it is securely in place. Use clamps or weights to hold the form steady.
Step 4: Mixing the Repair Material
Mixing the right proportions of LRB (Liquid Rubber Base) with sand is crucial for creating a durable repair compound:
- Mix Ratios: Combine 1 part LRB with up to 3 parts sand (preferably silica sand). Mix thoroughly to ensure a uniform consistency.
- Consistency: The mixture should be thick enough to hold its shape but workable enough to fill the form effectively.
Step 5: Filling the Form
With the form in place and the repair material mixed, proceed to fill the form:
- Pouring: Carefully pour the LRB/sand mixture into the form, ensuring all areas are filled.
- Leveling: Use a trowel or spatula to level the surface of the mixture, making sure it is smooth and even.
- Curing: Allow the mixture to cure for a few hours. The curing time may vary based on the thickness of the repair and environmental conditions.
Step 6: Removing the Form
Once the repair material has cured, it’s time to remove the form:
- Careful Removal: Gently remove the form, taking care not to disturb the repaired surface.
- Final Touches: Inspect the repaired area for any imperfections. If necessary, use additional LRB to fill small gaps or smooth out the surface.

Additional Tips for Successful Concrete Step Repair
- Weather Considerations: Perform repairs in suitable weather conditions. Extreme temperatures or high humidity can affect the curing process.
- Safety Precautions: Wear appropriate protective gear, including gloves and eye protection, when handling chemicals and applying repair materials.
- Regular Maintenance: Regularly inspect and maintain your concrete steps to prevent future damage. Clean the surface periodically and address any minor issues promptly.
Conclusion
Repairing deteriorating concrete steps with SANI-TRED® is a cost-effective and durable solution. By following this step-by-step guide, you can achieve professional-quality repairs that enhance the safety and appearance of your steps. SANI-TRED® products provide a permanent bond, exceptional flexibility, and long-lasting durability, making them the ideal choice for concrete step repair.
Don't let cracked and deteriorating concrete steps compromise the safety and aesthetics of your property. With SANI-TRED®, you can restore and protect your steps, ensuring they remain in excellent condition for years to come. Start your concrete step repair project today and experience the difference that SANI-TRED® products can make!
How to apply our Heavy Duty Textured Flooring System for even more durability, and traction.
- Apply 1 coat of PermaFlex (240 sq ft per gal) to all of the substrate.
- Patch and profile any joints, seams, cracks, holes and rough areas using LRB/TAV mixture (Liquid Rubber Base, Thickening Activator). LRB can be used by itself (as a liquid membrane) to smooth out and/or level any horizontal surface and can be used like a coating over vertical and inverted surfaces. Wall/floor junctions require a 1” bead of LRB/TAV mixture. LRB/TAV “Round Caulk Bead Chart”
- Once cured, mask around the run of the stairs. This ensures that you will only texture the run of the stairs and allow the rise of the stairs to remain smooth.
- Apply 1 coat of PermaFlex within the masked areas. While the PermaFlex is still wet, broadcast the Rubber Granules onto the wet coating (remove the masking tape as you go). When the PermaFlex has cured you will have bonded in place the texture granules and the loose excess granules should be removed.
- Apply 1 coat of LRB (60 sq ft per gal) on top of the Rubber Granules (masking is not necessary). Once the LRB has cured enough to walk on, proceed to the next step.
- Topcoat using 1 coat of PermaFlex (240 sq ft per gal) over the entire substrate.


