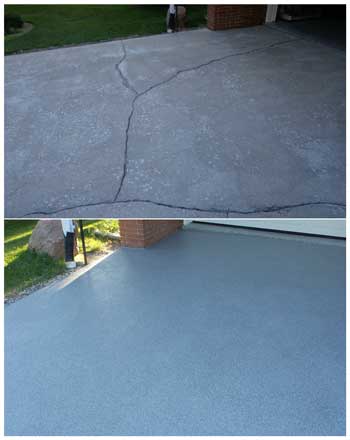
 Nearly all driveways will develop cracks at some time or other. The causes can be numerous. One is tree roots growing beneath the pad and another is the freeze-thaw cycle which can expand and contract concrete 9%. Instead of having to break up and pour a brand new slab, why not just repair the cracks with a little Sani-Tred.
Preparing Concrete
Preparation to remove all the mold, mildew, and ground-in dirt is the single most important factor in repairing concrete driveways. To prepare concrete acid etching and pressure watching is the best option. This is accomplished by mixing “Muriatic Acid” and water. Muriatic Acid is commonly found at most larger hardware stores, paint supply stores, lumber companies, swimming pool supply stores, Wal-Mart, Kmart, etc.
How To Acid Etch Concrete
Muriatic Acid is typically packaged at a 30% dilution; you want to dilute it down to a 10% by diluting 3 parts water to one part acid. You’ll need a gallon of diluted acid for every 200 square feet. Pour acid carefully in to water to avoid splashing, and use appropriate safety equipment.
Thoroughly wet concrete before applying acid. Apply acid dilution evenly using a garden watering can. After applying acid will begin to bubble, use a push broom to work it in, and then let sit for 10 minutes. Afterwards use a pressure washer to clean the concrete off. Then neutralize by applying a solution of 1 cup baking soda to 1 gallon of water then pressure wash again. For more detailed step by step instructions on acid etching concrete watch the video below or visit http://www.wikihow.com/Acid-Etch-Concrete.
Crack Repair and Resurfacing Concrete Driveways
Take extra pains to clean out all the cracks and crevices you may see, no matter how small or thin. You want your concrete patching to have a good surface to adhere to.
Once the concrete is completely dry. Prime the concrete with 1 coat of PermaFlex (240 sq ft per gal) using a roller or squeegee. This coat of PermaFlex liquid rubber coating will act as a binder within the substrate. PermaFlex can be thinned using either Xylene (in states where allowed) or Acetone to encourage even more rapid and deeper absorption/penetration.
Patch and profile any joints, seams, cracks, holes and rough areas using LRB/TAV mixture. 2-parts LRB is mixed with 1-part TAV 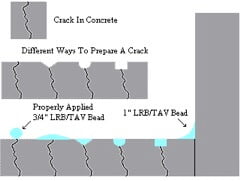 repairing-cracks-concrete-caulk to create the thickest mixture possible (similar in viscosity as silicone caulk). Wall/floor junctions require a 1” diameter caulk bead of LRB/TAV mixture and most other cracks & joints use a 3/4” diameter caulk bead.
After applying base coat and patching cracks with LRB apply a topcoat of PermaFlex® (240 sq ft per gal). If you are looking for a decorative surface you can achieve the look of granite with our Graniflex system https://theconcreteprotector.com/graniflex/
Your repaired driveway should be able to handle foot traffic within 6 hours of adding the texture to it. Give it about 24 hours before driving your car onto it. This does a really good job of patching without having to bust up everything and deal with the mess and also suffer the costs of putting in a whole new driveway.
The Sani-Tred Solution
Looking for a garage floor or driveway coating that will keep your concrete from ever cracking again? Sounds too good to be true? Sani-Tred permanently bonds with concrete at a molecular level, and provides 590% elongation. It’s the only product of its kind with a lifetime guarantee. To learn more about how to fix driveway cracks, visit https://sanitred.com/garage-floor-coating-waterproof/ or call 1-866-784-3308

Thanks for the information. Judging by what you’ve said, it seems like it’s important to stop cracks in your driveway as soon as they appear. I’m going to follow your tip about watching out for tree roots growing through, the “freeze-thaw cycle”, etc. If I see any problems, I’ll definitely get the driveway resurfaced.
I’ve always wanted to learn how to acid etch concrete, so it’s a good thing that you included this information in your post. Diluting the acid you’re using seems like a smart idea before you try to use it. I can see how muratic acid is very strong, so it seems like diluting it makes it safer to use. I agree, it still seems like a good idea to avoid splashing it around, so I’ll make sure that I pour it carefully while working on my concrete. Thanks for the information!
What you need is a video showing the whole process from acid etching to caulking, priming, and re-coating with your product.
That would be much more helpful to sell your product I believe. Start to finish. Showing before and after in the video.